Index - [Back](Widget Styling.ipynb)
from __future__ import print_function # For py 2.7 compat
Building a Custom Widget
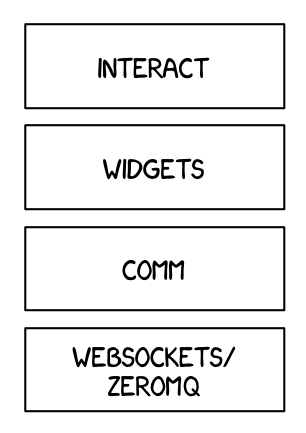
The widget framework is built on top of the Comm framework (short for communication). The Comm framework is a framework that allows you send/receive JSON messages to/from the front-end (as seen below).
To create a custom widget, you need to define the widget both in the back-end and in the front-end.
Building a Custom Widget
To get started, you'll create a simple hello world widget. Later you'll build on this foundation to make more complex widgets.
Back-end (Python)
DOMWidget and Widget
To define a widget, you must inherit from the Widget or DOMWidget base class. If you intend for your widget to be displayed in the IPython notebook, you'll need to inherit from the DOMWidget. The DOMWidget class itself inherits from the Widget class. The Widget class is useful for cases in which the Widget is not meant to be displayed directly in the notebook, but instead as a child of another rendering environment. For example, if you wanted to create a three.js widget (a popular WebGL library), you would implement the rendering window as a DOMWidget and any 3D objects or lights meant to be rendered in that window as Widgets.
_view_name
Inheriting from the DOMWidget does not tell the widget framework what front-end widget to associate with your back-end widget. Instead, you must tell it yourself by defining a specially named Traitlet, _view_name (as seen below).
from IPython.html import widgets
from IPython.utils.traitlets import Unicode

class HelloWidget(widgets.DOMWidget):
    _view_name = Unicode('HelloView', sync=True)
sync=True traitlets
Traitlets is an IPython library for defining type-safe properties on configurable objects. For this tutorial you do not need to worry about the configurable piece of the traitlets machinery. The sync=True keyword argument tells the widget framework to handle synchronizing that value to the front-end. Without sync=True, the front-end would have no knowledge of _view_name.
Other traitlet types
Unicode, used for _view_name, is not the only Traitlet type, there are many more some of which are listed below:
- Any
- Bool
- Bytes
- CBool
- CBytes
- CComplex
- CFloat
- CInt
- CLong
- CRegExp
- CUnicode
- CaselessStrEnum
- Complex
- Dict
- DottedObjectName
- Enum
- Float
- FunctionType
- Instance
- InstanceType
- Int
- List
- Long
- Set
- TCPAddress
- Tuple
- Type
- Unicode
Not all of these traitlets can be synchronized across the network, only the JSON-able traits and Widget instances will be synchronized.
Front-end (JavaScript)
Models and views
The IPython widget framework front-end relies heavily on Backbone.js. Backbone.js is an MVC (model view controller) framework. Widgets defined in the back-end are automatically synchronized with generic Backbone.js models in the front-end. The traitlets are added to the front-end instance automatically on first state push. The _view_name trait that you defined earlier is used by the widget framework to create the corresponding Backbone.js view and link that view to the model.
Import the WidgetManager
You first need to import the widget and manager modules. You will use it later to register your view by name (the same name you used in the back-end). To import the modules, use the require method of require.js (as seen below).
%%javascript
require(["widgets/js/widget", "widgets/js/manager"], function(widget, manager){

});
Define the view
Next define your widget view class. Inherit from the DOMWidgetView by using the .extend method. Register the view class with the widget manager by calling .register_widget_view. The first parameter is the widget view name (_view_name that you defined earlier in Python) and the second is a handle to the class type.
%%javascript
require(["widgets/js/widget", "widgets/js/manager"], function(widget, manager){

    // Define the HelloView
    var HelloView = widget.DOMWidgetView.extend({

    });

    // Register the HelloView with the widget manager.
    manager.WidgetManager.register_widget_view('HelloView', HelloView);
});
Render method
Lastly, override the base render method of the view to define custom rendering logic. A handle to the widget's default div element can be acquired via this.$el. The $el property is a jQuery object handle (which can be thought of as a supercharged version of the normal DOM element's handle).
%%javascript
require(["widgets/js/widget", "widgets/js/manager"], function(widget, manager){

    var HelloView = widget.DOMWidgetView.extend({

        // Render the view.
        render: function(){
            this.$el.text('Hello World!');
        },
    });

    manager.WidgetManager.register_widget_view('HelloView', HelloView);
});
Test
You should be able to display your widget just like any other widget now.
HelloWidget()
Making the widget stateful
There is not much that you can do with the above example that you can't do with the IPython display framework. To change this, you will make the widget stateful. Instead of displaying a static "hello world" message, it will display a string set by the back-end. First you need to add a traitlet in the back-end. Use the name of value to stay consistent with the rest of the widget framework and to allow your widget to be used with interact.
class HelloWidget(widgets.DOMWidget):
    _view_name = Unicode('HelloView', sync=True)
    value = Unicode('Hello World!', sync=True)
Accessing the model from the view
To access the model associate with a view instance, use the model property of the view. get and set methods are used to interact with the Backbone model. get is trivial, however you have to be careful when using set. After calling the model set you need call the view's touch method. This associates the set operation with a particular view so output will be routed to the correct cell. The model also has a on method which allows you to listen to events triggered by the model (like value changes).
Rendering model contents
By replacing the string literal with a call to model.get, the view will now display the value of the back-end upon display. However, it will not update itself to a new value when the value changes.
%%javascript
require(["widgets/js/widget", "widgets/js/manager"], function(widget, manager){

    var HelloView = widget.DOMWidgetView.extend({

        render: function(){
            this.$el.text(this.model.get('value'));
        },
    });

    manager.WidgetManager.register_widget_view('HelloView', HelloView);
});
Dynamic updates
To get the view to update itself dynamically, register a function to update the view's value when the model's value property changes. This can be done using the model.on method. The on method takes three parameters, an event name, callback handle, and callback context. The Backbone event named change will fire whenever the model changes. By appending :value to it, you tell Backbone to only listen to the change event of the value property (as seen below).
%%javascript
require(["widgets/js/widget", "widgets/js/manager"], function(widget, manager){

    var HelloView = widget.DOMWidgetView.extend({

        render: function(){
            this.value_changed();
            this.model.on('change:value', this.value_changed, this);
        },

        value_changed: function() {
            this.$el.text(this.model.get('value'));
        },
    });

    manager.WidgetManager.register_widget_view('HelloView', HelloView);
});
Test
w = HelloWidget()
w
w.value = 'test'
Finishing
Bidirectional communication
The examples above dump the value directly into the DOM. There is no way for you to interact with this dumped data in the front-end. To create an example that accepts input, you will have to do something more than blindly dumping the contents of value into the DOM. In this part of the tutorial, you will use a jQuery spinner to display and accept input in the front-end. IPython currently lacks a spinner implementation so this widget will be unique.
Update the Python code
You will need to change the type of the value traitlet to Int. It also makes sense to change the name of the widget to something more appropriate, like SpinnerWidget.
from IPython.utils.traitlets import CInt
class SpinnerWidget(widgets.DOMWidget):
    _view_name = Unicode('SpinnerView', sync=True)
    value = CInt(0, sync=True)
Updating the Javascript code
The jQuery docs for the spinner control say to use .spinner to create a spinner in an element. Calling .spinner on $el will create a spinner inside $el. Make sure to update the widget name here too so it's the same as _view_name in the back-end.
%%javascript
require(["widgets/js/widget", "widgets/js/manager"], function(widget, manager){

    var SpinnerView = widget.DOMWidgetView.extend({

        render: function(){

            // jQuery code to create a spinner and append it to $el
            this.$input = $('<input />');
            this.$el.append(this.$input);
            this.$spinner = this.$input.spinner({
                change: function( event, ui ) {}
            });

            this.value_changed();
            this.model.on('change:value', this.value_changed, this);
        },

        value_changed: function() {

        },
    });

    manager.WidgetManager.register_widget_view('SpinnerView', SpinnerView);
});
Getting and setting the value
To set the value of the spinner on update from the back-end, you need to use jQuery's spinner API. spinner.spinner('value', new) will set the value of the spinner. Add that code to the value_changed method to make the spinner update with the value stored in the back-end((. Using jQuery's spinner API, you can add a function to handle the spinner change event** by passing it in when constructing the spinner. Inside the change event, call model.set to set the value and then touch to inform the framework that this view was the view that caused the change to the model. Note: The var that = this; is a JavaScript trick to pass the current context into closures.
%%javascript
require(["widgets/js/widget", "widgets/js/manager"], function(widget, manager){

    var SpinnerView = widget.DOMWidgetView.extend({

        render: function(){

            var that = this;
            this.$input = $('<input />');
            this.$el.append(this.$input);
            this.$spinner = this.$input.spinner({
                change: function( event, ui ) {
                    that.handle_spin();
                },
                spin: function( event, ui ) {
                    that.handle_spin();
                }
            });

            this.value_changed();
            this.model.on('change:value', this.value_changed, this);
        },

        value_changed: function() {
            this.$spinner.spinner('value', this.model.get('value'));
        },

        handle_spin: function() {
            this.model.set('value', this.$spinner.spinner('value'));
            this.touch();
        },
    });

    manager.WidgetManager.register_widget_view('SpinnerView', SpinnerView);
});
Test
w = SpinnerWidget(value=5)
w
w.value
w.value = 20
Trying to use the spinner with another widget.
from IPython.display import display
w1 = SpinnerWidget(value=0)
w2 = widgets.IntSlider()
display(w1,w2)

from IPython.utils.traitlets import link
mylink = link((w1, 'value'), (w2, 'value'))
Index - [Back](Widget Styling.ipynb)