NbConvert, Python library
In this Notebook, I will introduce you to the programatic API of nbconvert to show you how to use it in various context.
For this I will use one of @jakevdp great blog post. I've explicitely chosen a post with no javascript tricks as Jake seem to be found of right now, for the reason that the becommings of embeding javascript in nbviewer, which is based on nbconvert is not fully decided yet.
This will not focus on using the command line tool to convert file. The attentive reader will point-out that no data are read from, or written to disk during the conversion process. Indeed, nbconvert as been though as much as possible to avoid IO operation and work as well in a database, or web-based environement.
Quick overview
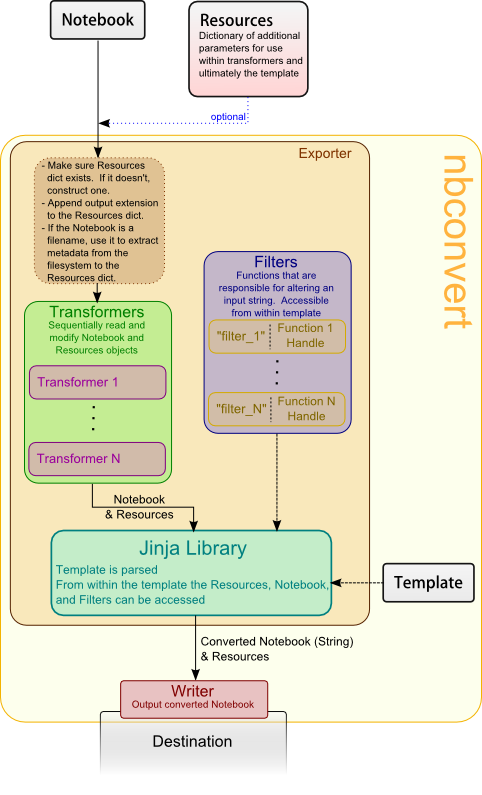
Credit, Jonathan Freder (@jdfreder on github)
<center>
 </center>
The main principle of nbconvert is to instanciate a Exporter that controle
a pipeline through which each notebook you want to export with go through.
Let's start by importing what we need from the API, and download @jakevdp's notebook.
import requests
response = requests.get('http://jakevdp.github.com/downloads/notebooks/XKCD_plots.ipynb')
response.text[0:60]+'...'
If you do not have request install downlad by hand, and read the file as usual.
We read the response into a slightly more convenient format which represent IPython notebook. There are not real advantages for now, except some convenient methods, but with time this structure should be able to guarantee that the notebook structure is valid. Note also that the in-memory format and on disk format can be slightly different. In particual, on disk, multiline strings might be spitted into list of string to be more version control friendly.
from IPython import nbformat
jake_notebook = nbformat.reads(response.text, as_version=4)
jake_notebook.cells[0]
So we have here Jake's notebook in a convenient form, which is mainly a Super-Powered dict and list nested. You don't need to worry about the exact structure.
The nbconvert API exposes some basic exporter for common format and default options. We will start by using one of them. First we import it, instanciate an instance with most of the default parameters and fed it the downloaded notebook.
from IPython.config import Config
from IPython.nbconvert import HTMLExporter

## I use `basic` here to have less boilerplate and headers in the HTML.
## we'll see later how to pass config to exporters.
html_exporter = HTMLExporter(config=Config({'HTMLExporter':{'default_template':'basic'}}))
(body, resources) = html_exporter.from_notebook_node(jake_notebook)
The exporter returns a tuple containing the body of the converted notebook, here raw HTML, as well as a resources dict. The resource dict contains (among many things) the extracted PNG, JPG [...etc] from the notebook when applicable. The basic HTML exporter does keep them as embeded base64 into the notebook, but one can do ask the figures to be extracted. Cf advance use. So for now the resource dict should be mostly empty, except for 1 key containing some css, and 2 others whose content will be obvious.
Exporter are stateless, you won't be able to extract any usefull information (except their configuration) from them.
You can directly re-use the instance to convert another notebook. Each exporter expose for convenience a from_file and from_filename methods if you need.
print([key for key in resources ])
print(resources['metadata'])
print(resources['output_extension'])
# print resources['inlining'] # too lng to be shown
# Part of the body, here the first Heading
start = body.index('<h1 id', )
print(body[:400]+'...')
You can directly write the body into an HTML file if you wish, as you see it does not contains any body tag, or style declaration, but thoses are included in the default HtmlExporter if you do not pass it a config object as I did.
Extracting Figures
When exporting one might want to extract the base64 encoded figures to separate files, this is by default what does the RstExporter does, let see how to use it.
from IPython.nbconvert import RSTExporter

rst_exporter = RSTExporter()

(body,resources) = rst_exporter.from_notebook_node(jake_notebook)
print(body[:970]+'...')
print('[.....]')
print(body[800:1200]+'...')
Here we see that base64 images are not embeded, but we get what look like file name. Actually those are (Configurable) keys to get back the binary data from the resources dict we havent inspected earlier.
So when writing a Rst Plugin for any blogengine, Sphinx or anything else, you will be responsible for writing all those data to disk, in the right place. Of course to help you in this task all those naming are configurable in the right place.
let's try to see how to get one of these images
list(resources['outputs'])
We have extracted 5 binary figures, here pngs, but they could have been svg, and then wouldn't appear in the binary sub dict.
keep in mind that a object having multiple repr will store all it's repr in the notebook.
Hence if you provide _repr_javascript_,_repr_latex_ and _repr_png_to an object, you will be able to determine at conversion time which representaition is the more appropriate. You could even decide to show all the representaition of an object, it's up to you. But this will require beeing a little more involve and write a few line of Jinja template. This will probably be the subject of another tutorial.
Back to our images,
from IPython.display import Image
Image(data=resources['outputs']['output_3_0.png'],format='png')

Yep, this is indeed the image we were expecting, and I was able to see it without ever writing or reading it from disk. I don't think I'll have to show to you what to do with those data, as if you are here you are most probably familiar with IO.
Extracting figures with HTML Exporter ?
Use case:
> I write an awesome blog in HTML, and I want all but having base64 embeded images. Having one html file with all inside is nice to send to coworker, but I definitively want resources to be cached ! So I need an HTML exporter, and I want it to extract the figures !
Some theory
The process of converting a notebook to a another format with the nbconvert Exporters happend in a few steps:
- Get the notebook data and other required files. (you are responsible for that)
- Feed them to the exporter that will
- sequentially feed the data to a number of
Preprocessors. Preprocessor only act on the structure
- feed the notebook through the jinja templating engine
- the use templates are configurable.
- templates make use of configurable macros called filters.
- sequentially feed the data to a number of
- The exporter return the converted notebook as well as other relevant resources as a tuple.
- Write what you need to disk, or elsewhere. (You are responsible for it)
Here we'll be interested in the Preprocessors. Each Preprocessor is applied successively and in order on the notebook before going through the conversion process.
We provide some preprocessor that do some modification on the notebook structure by default.
One of them, the ExtractOutputPreprocessor is responsible for crawling notebook,
finding all the figures, and put them into the resources directory, as well as choosing the key
(filename_xx_y.extension) that can replace the figure in the template.
The ExtractOutputPreprocessor is special in the fact that it should be availlable on all Exporters, but is just inactive by default on some exporter.
# 3rd one should be <ExtractOutputPreprocessor>
html_exporter._preprocessors
To enable it we will use IPython configuration/Traitlets system. If you are have already set some IPython configuration options, this will look pretty familiar to you. Configuration option are always of the form:
ClassName.attribute_name = value
A few ways exist to create such config, like reading a config file in your profile, but you can also do it programatically usign a dictionary. Let's create such a config object, and see the difference if we pass it to our HTMLExporter
from IPython.config import Config

c =  Config({
            'ExtractOutputPreprocessor':{'enabled':True}
            })

exportHTML = HTMLExporter()
exportHTML_and_figs = HTMLExporter(config=c)

(_, resources)          = exportHTML.from_notebook_node(jake_notebook)
(_, resources_with_fig) = exportHTML_and_figs.from_notebook_node(jake_notebook)

print('resources without the "figures" key :')
print(list(resources))

print('')
print('Here we have one more field')
print(list(resources_with_fig))
list(resources_with_fig['outputs'])
So now you can loop through the dict and write all those figures to disk in the right place...
Custom Preprocessor
Of course you can imagine many transformation that you would like to apply to a notebook. This is one of the reason we provide a way to register your own preprocessors that will be applied to the notebook after the default ones.
To do so you'll have to pass an ordered list of Preprocessors to the Exporter constructor.
But what is an preprocessor ? Preprocessor can be either decorated function for dead-simple Preprocessors that apply
independently to each cell, for more advance transformation that support configurability You have to inherit from
Preprocessor and define a call method as we'll see below.
All transforers have a magic attribute that allows it to be activated/disactivate from the config dict.
from IPython.nbconvert.preprocessors import Preprocessor
import IPython.config
print("Four relevant docstring")
print('=============================')
print(Preprocessor.__doc__)
print('=============================')
print(Preprocessor.preprocess.__doc__)
print('=============================')
print(Preprocessor.preprocess_cell.__doc__)
print('=============================')
We don't provide convenient method to be aplied on each worksheet as the data structure for worksheet will be removed. (not the worksheet functionality, which is still on it's way)
Example
I'll now demonstrate a specific example requested while nbconvert 2 was being developed. The ability to exclude cell from the conversion process based on their index.
I'll let you imagin how to inject cell, if what you just want is to happend static content at the beginning/end of a notebook, plese refer to templating section, it will be much easier and cleaner.
from IPython.utils.traitlets import Integer
class PelicanSubCell(Preprocessor):
    """A Pelican specific preprocessor to remove somme of the cells of a notebook"""

    # I could also read the cells from nbc.metadata.pelican is someone wrote a JS extension
    # But I'll stay with configurable value.
    start = Integer(0, config=True, help="first cell of notebook to be converted")
    end   = Integer(-1, config=True, help="last cell of notebook to be converted")

    def preprocess(self, nb, resources):

        #nbc = deepcopy(nb)
        nbc = nb
        # don't print in real preprocessor !!!
        print("I'll keep only cells from ", self.start, "to ", self.end, "\n\n")
        nbc.cells = nb.cells[self.start:self.end]
        return nbc, resources
# I create this on the fly, but this could be loaded from a DB, and config object support merging...
c =  Config()
c.PelicanSubCell.enabled = True
c.PelicanSubCell.start = 4
c.PelicanSubCell.end = 6
I'm creating a pelican exporter that take PelicanSubCell extra preprocessors and a config object as parameter. This might seem redundant, but with configuration system you'll see that one can register an inactive preprocessor on all exporters and activate it at will form its config files and command line.
pelican = RSTExporter(preprocessors=[PelicanSubCell], config=c)
print(pelican.from_notebook_node(jake_notebook)[0])
Programatically make templates
from jinja2 import DictLoader

dl = DictLoader({'full.tpl':
"""
{%- extends 'basic.tpl' -%}

{% block footer %}
FOOOOOOOOTEEEEER
{% endblock footer %}
"""})


exportHTML = HTMLExporter(extra_loaders=[dl])
(body,resources) = exportHTML.from_notebook_node(jake_notebook)
for l in body.split('\n')[-4:]:
    print(l)
Real World Use
@jakevdp use Pelican and IPython Notebook to blog. Pelican Will use nbconvert programatically to generate blog post. Have a look a Pythonic Preambulations for Jake blog post.
@damianavila Wrote a Nicholas Plugin to Write blog post as Notebook and is developping a js-extension to publish notebooks in one click from the web app.
<center>
</center>As @Mbussonn requested... easieeeeer! Deploy your Nikola site with just a click in the IPython notebook! http://t.co/860sJunZvj cc @ralsina
— Damián Avila (@damian_avila) August 21, 2013
And finaly, what you just did, is replicate what nbviewer does. WHich to fetch a notebook from url, convert it and send in back to you as a static html.
A few gotchas
Jinja blocks use {% %}by default which does not play nicely with $\LaTeX$, hence thoses are replaced by ((* *)) in latex templates.